Showing posts with label Tutorial. Show all posts

Wednesday, February 1, 2017

YouTube cover template 2017 - Plantilla para cabecera de YouTube 2017


Hello, everyone! A long time i don't say anything... I'm really busy, but i worked a little on some designs for my Social Networks. In this case, lets talk about YouTube!
Hola a todos! Hace mucho tiempo que no digo nada... Estoy muy ocupada, pero trabajé un poco en algunos diseños para mis redes sociales. En éste caso, hablemos de YouTube!

I tried to find some templates on Google, but any of them, worked for current design (2017)... :(
So... I decided to contribute a little, to help you to design your covers.
Intenté encontrar algunas plantillas en Google, pero ninguna de ellas funcionaba para el diseño actual (2017)... :(
Así que... Decidí contribuir un poco, para ayudaros a diseñar vuestras cabeceras.

Let's start with the sizes!
First you need to create a new file (I use Adobe Photoshop Cs5) with the following measures.
2560 (width) x 1440 (height) px.
Empecemos con las medidas!
Lo primero que necesitáis, es crear un nuevo archivo (Yo utilizo Adobe photoshop Cs5) con las siguientes medidas.
2560 (Ancho) x 1440 (Alto) px.

 As i said, i used Adobe photoshop Cs5 and the rulers.
Como ya dije, utilicé Adobe photoshop Cs5 y las reglas.

This is not a PERFECT template, just an aproximation.
No es una plantilla PERFECTA, es una aproximación.

Here the template/Aquí la plantilla:

https://www.dropbox.com/sh/qtxacc6z56dbq7m/AADR51_a1f_wsuk87mA1292ea?dl=0

Click the "Download" icon, to open the Dropbox files.
(PSD and PNG format)
Clica el botón de "Descarga", para abrir los archivos de Dropbox.
(formato PSD y PNG)


I attached the PNG image format and PSD (photoshop) file, in the case you need to use my rulers guides.
This is how it looks the Download link, Ok? No consusions.
Adjunté el formato de imagen PNG y PSD (photoshop), en el caso de que necesitéis usar mis guías de regla.
Así es como se ve el link de Descarga, Ok? Sin confusiones. 


 And that is everything! I hope you find this post useful!
Let me know in the comments if you want more content like this (GRAPHIC DESIGN) ideas, tutorials, inspiration, templates, colours, photo/edition etc
Y eso fue todo! Espero que encontréis útil este post!
Hacerme saber en los comentarios si os gustaría que hiciera más contenido como éste (DISEÑO GRÁFICO) ideas, tutoriales, inspiración, plantillas, colores, edición de fotos etc

https://www.youtube.com/channel/UCD6BWZqVHs9HCFXb54N9kJQ

Do not miss to say that you can subscribe to my channel! I would like to upload many videos soon.
Que no falte decir que podéis suscribiros a mi canal! Me gustaría subir muchos vídeos pronto.

https://www.youtube.com/channel/UCD6BWZqVHs9HCFXb54N9kJQ

 See you soon!
Os veo pronto!
Monday, March 23, 2015

How to make Mirror effect in Photoshop Cs5- Cómo hacer efecto espejo en Photoshop Cs5


Hello, everyone! A long time ago i don't make photoshop or any tutorial... I'm super lazy...
Well... Today i want to show you how i make the mirror effect in Photoshop CS5.
Hola a tod@s! Hace mucho tiempo que no subo ningún tutorial de photoshop o de ningún tipo... Soy super vaga,,,
Bueno... Hoy quiero enseñaros cómo hacer el efecto espejo con photoshop CS5.

Let's Start!
Empecemos!

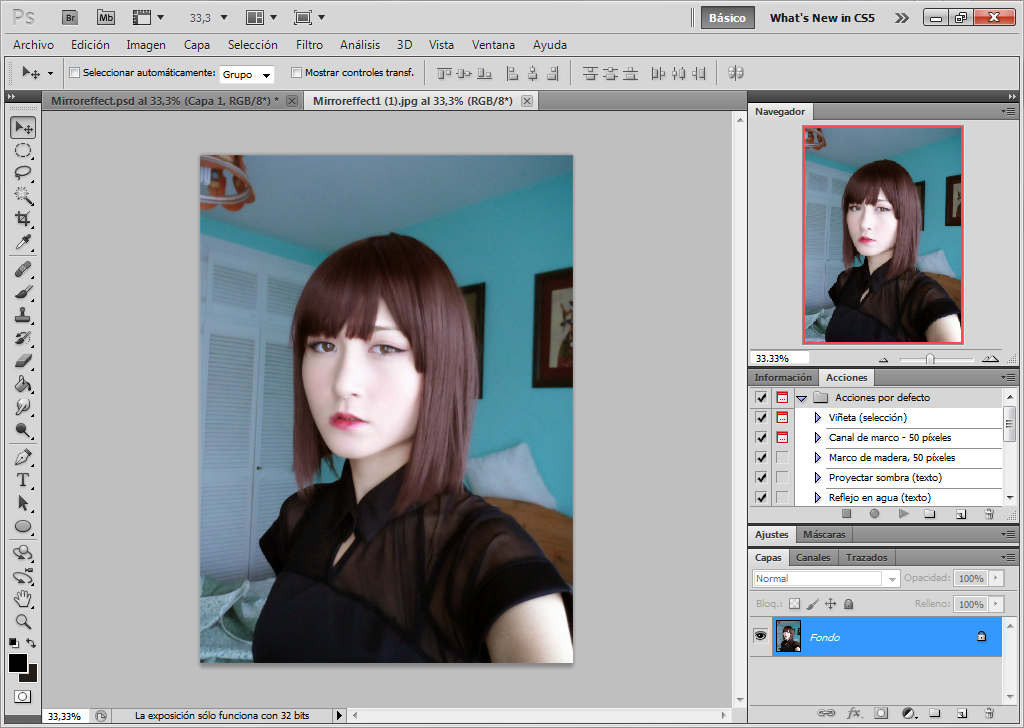
Choose any photo you want. I personally prefer use profile face photos or average profile for these effects.
Elige cualquier foto que quieras. Yo personalmente prefiero usar foros de perfil o medio perfil para estos efectos.

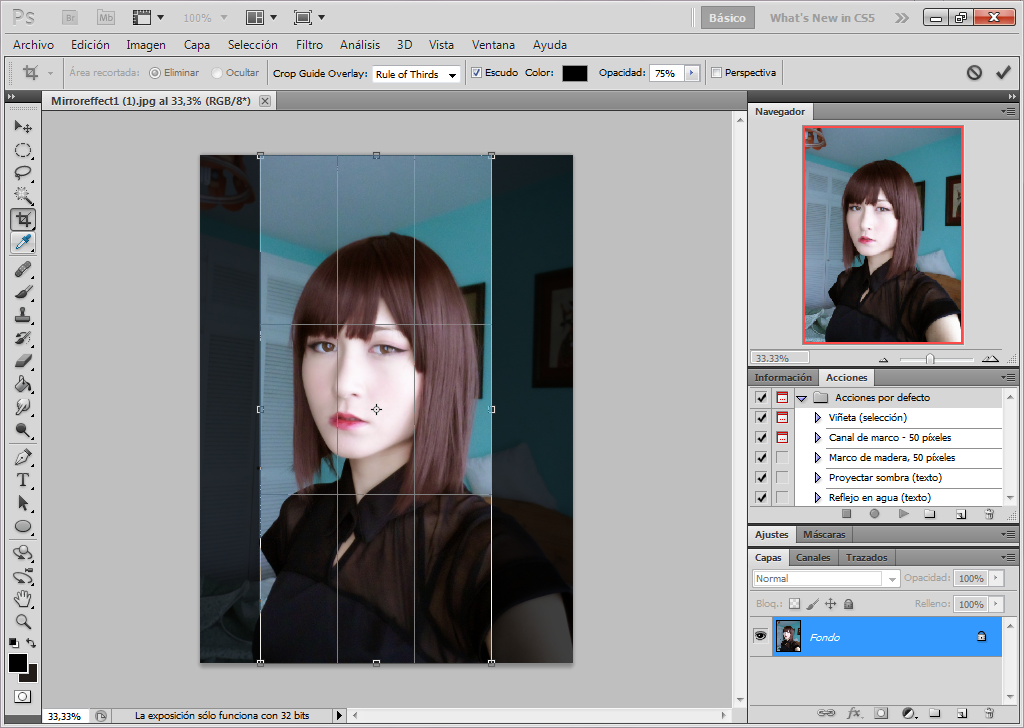
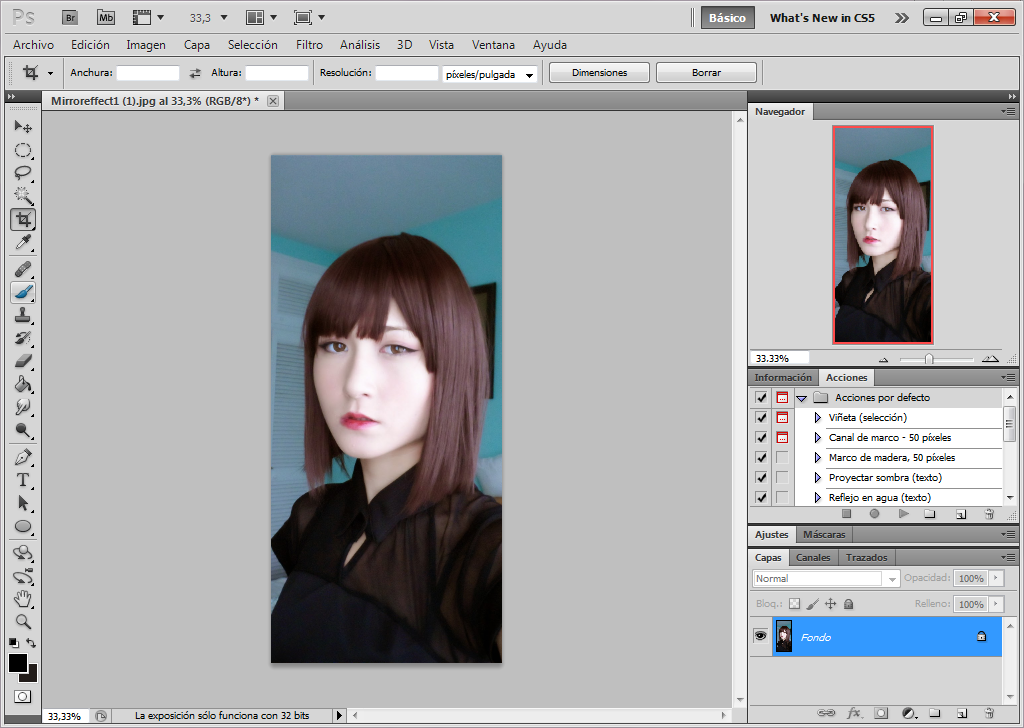
Crop the photo in any size you want. I recommend to crop them a lot to make this cool symmetric effect.
Corta la imagen en el tamaño que desees. Yo recomiendo recortarlas bastantes para crear este efecto de simetría.

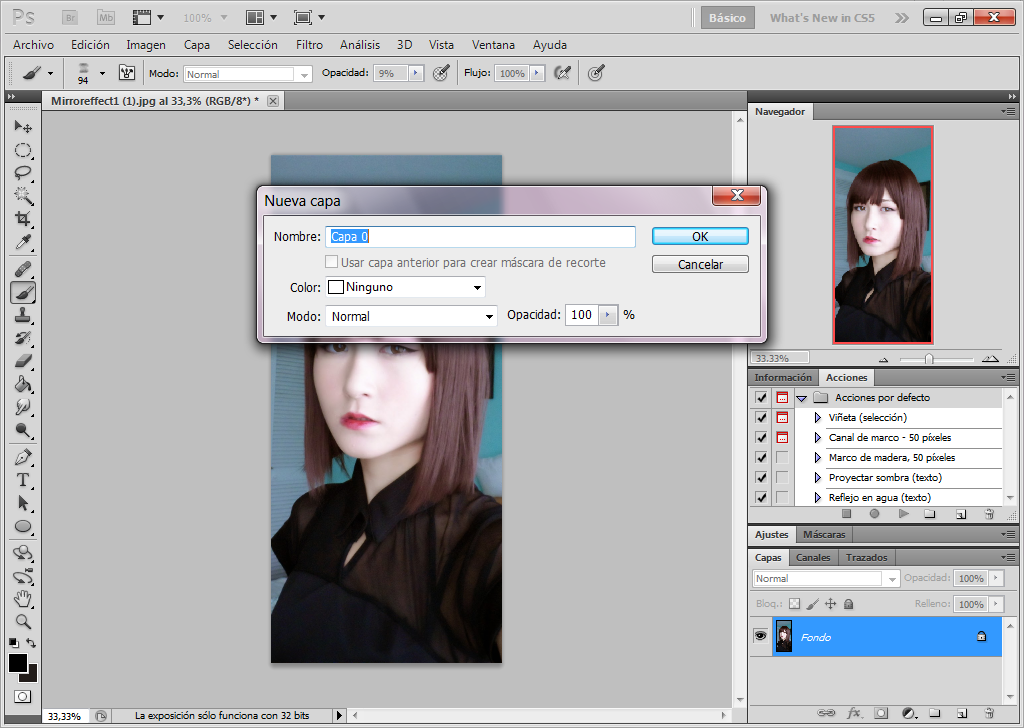
Once time the photo is cropped you will need to transform the Background Layer in Layer mode, with Double Click.
Una vez la imagen esté recortada necesitarás transformar la capa de Fondo en modo Capa, con doble clic.

Background layer now is named Layer 0 or Capa 0
La capa de Fondo ahora pasa a llamarse Capa 0 o Layer 0

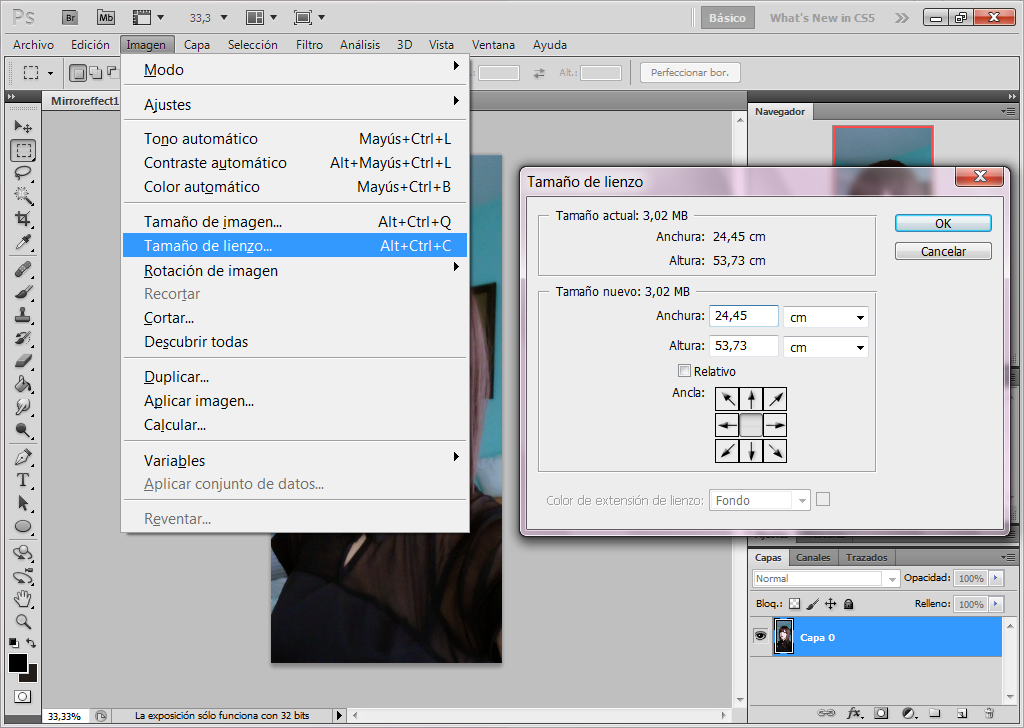
Then lets change the Canvas Size.
Cambiemos el Tamaño de lienzo.

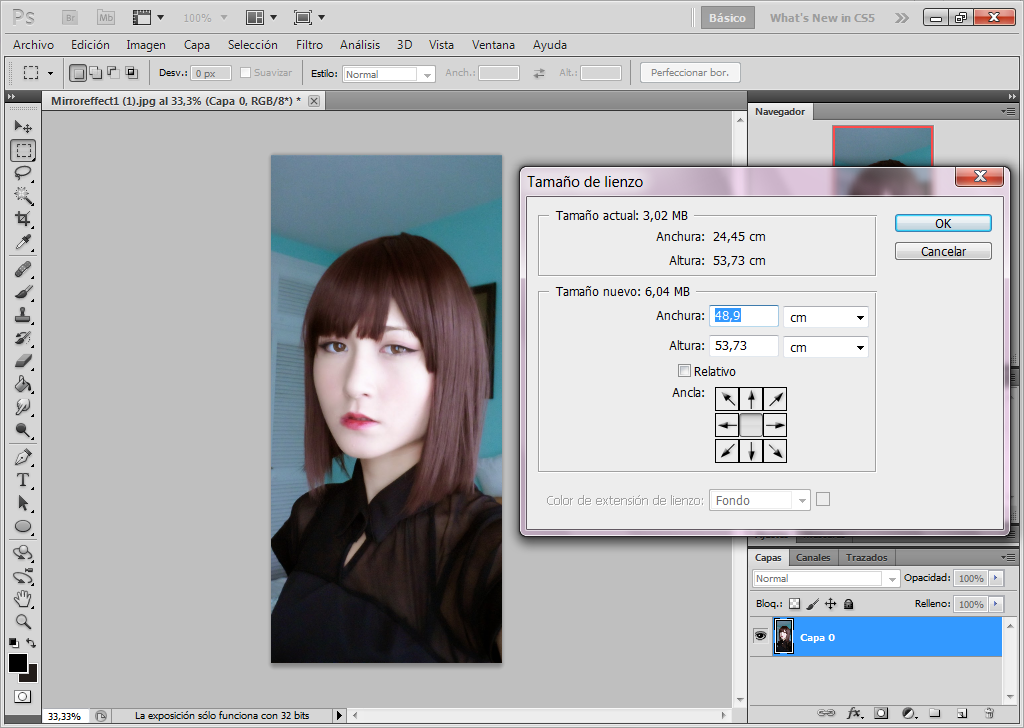
You have to multiply x2 the width size.
Mine was 24,45cm, so then i need to select 48,9cm width.
Tienes que multiplicar x2 la anchura.
La mía era de 24,45cm, así que tuve que seleccionar 48,9cm de ancho.


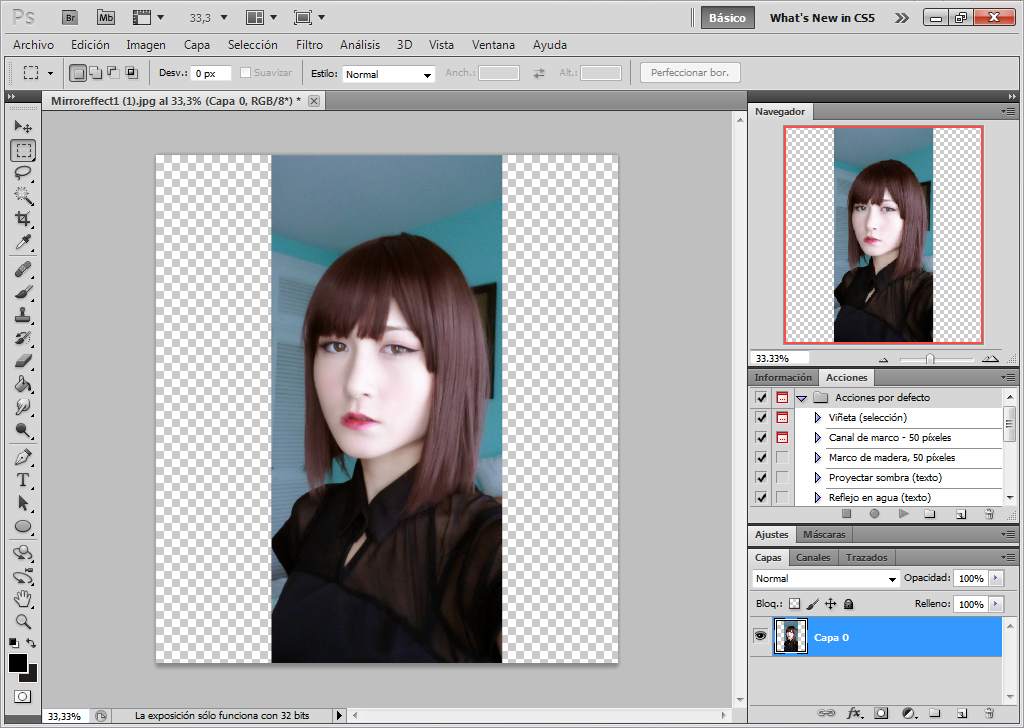
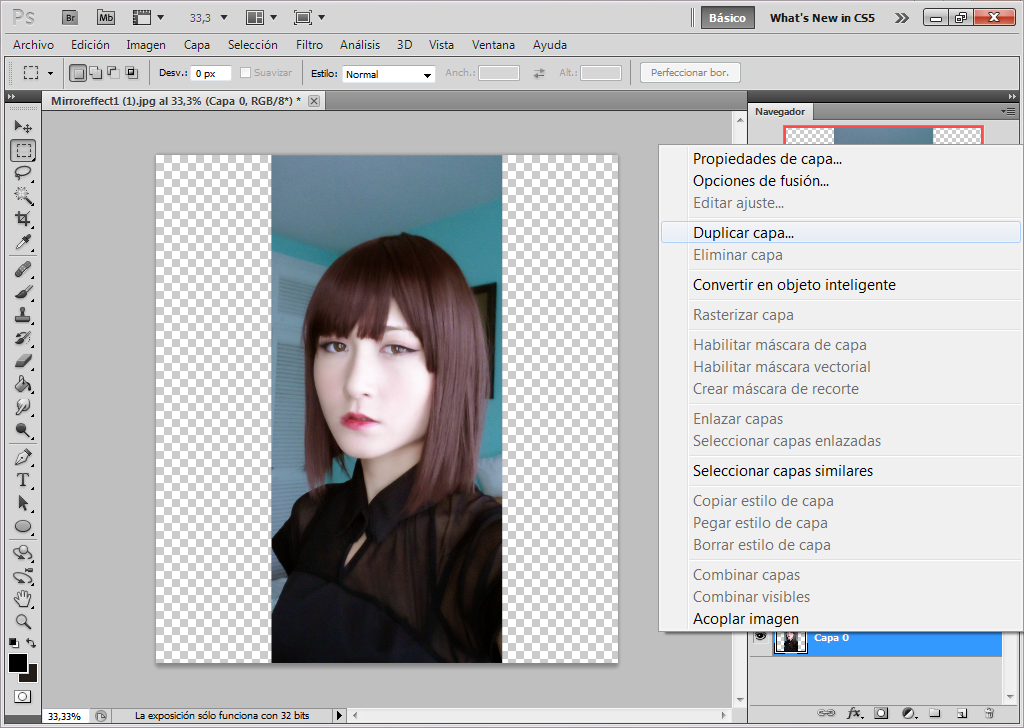
When it's done you will see that the canvas is bigger and with the transparend background.
Now duplicate the layer.
Cuando esté hecho podrás ver que el tamaño del lienzo es más grande y está con el fondo transparente.
Ahora duplica la capa.

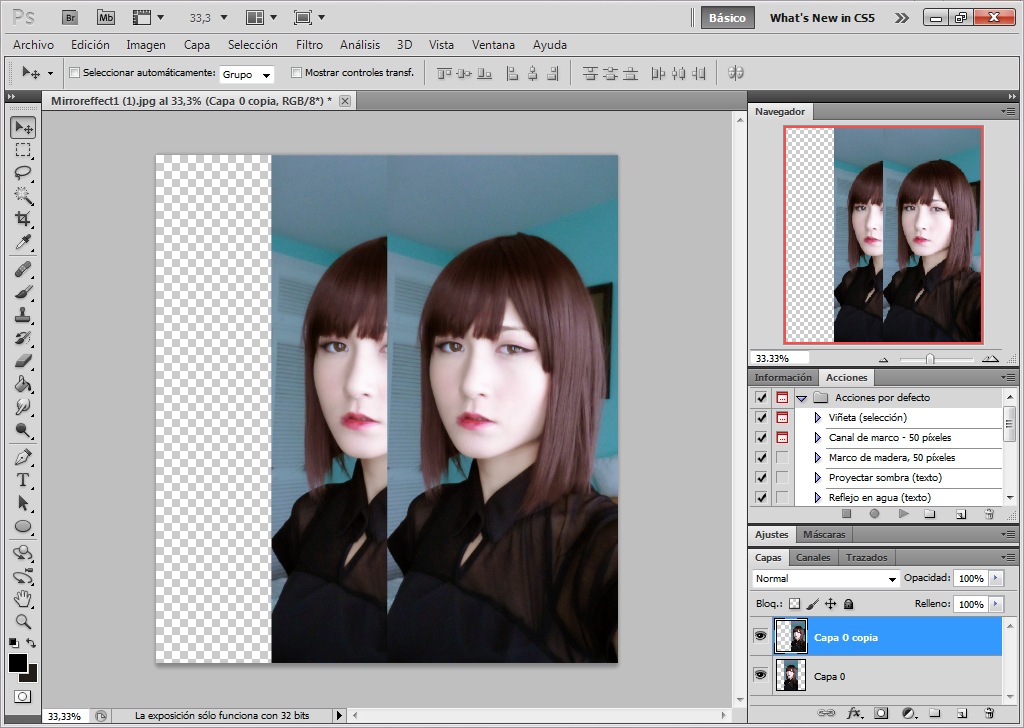
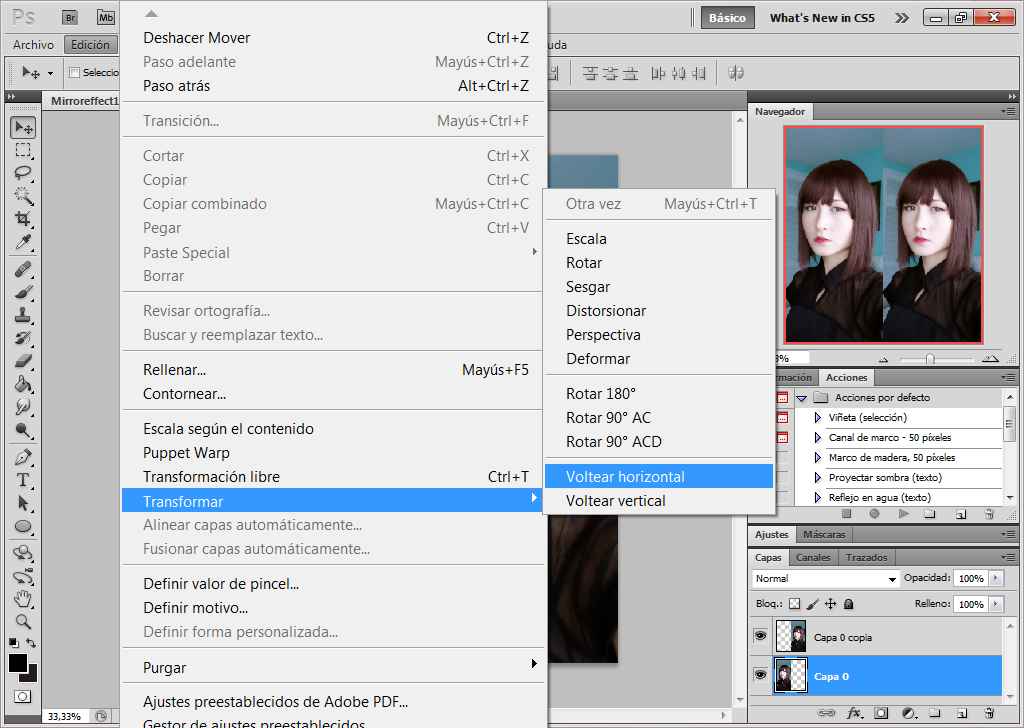
The image is duplicated. Now we are going to transform the image.
La imagen está duplicada. Ahora vamos a transformar la imagen.

Go to Image options/Transform/Flip horizontal
Ve a las opciones de imagen/Tranformar/Voltear horizontal

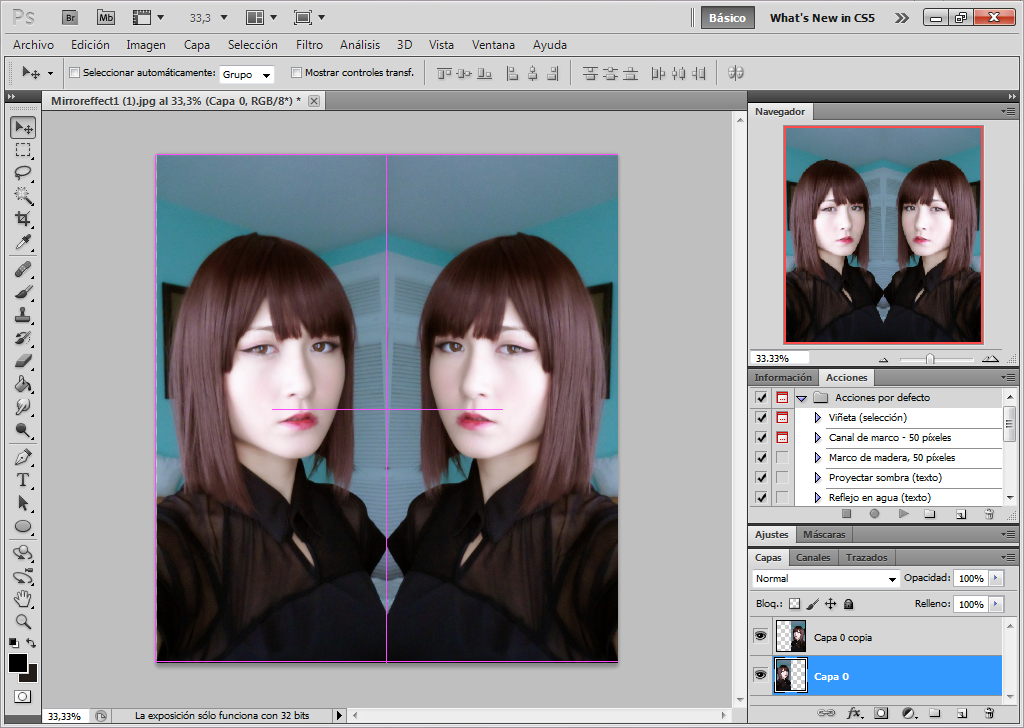
Move the image just in the other end. And it's done!
Easy, no?!
Mueve la imagen en el otro extremo. Y ya está!
Fácil, no?!

This is the result!
Éste es el resultado!

Let me know if you want more photoshop tutorials if you want! I'm planning to make a tutorial of how i fix my photos.
Hacerme saber si queréis más tutoriales de photoshop! Estoy planeando hacer uno de cómo arreglo mis fotos.

Oh! BTW! Today i have a good new!
VOGUE ITALIA plublished another photo of me! I'm so excited! I hope you like it!
Thanks to my beautiful photographer Nanihta for make this possible.
Oh! Por cierto! Hoy tengo una buena noticia!
VOGUE ITALIA ha publicado otra foto mía! Estoy muy emocionada! Espero que os guste!
Gracias a mi hermosa fotógrafa Nanihta por hacer esto posible!


See you in the next post!
Os veo en el siguiente post!


Monday, September 15, 2014

Si compras 2 pares de lentillas, el envío Express sale SOLO a 15$

Hello everyone! Today i want to share with you, guys how to get a really cheap circle lenses in 4-6 days!
HOW? Let's start!
Hola a tod@s! Hoy quiero compartir con ustedes una manera para conseguir lentillas/pupilentes muy baratas y con envío expres, en 4-6 días! 

CÓMO? Empecemos!


Uniqso is giving a special promotion that if you buy 2 PAIRS of circle lenses and you choose the Express shipping this costs only $15 (11.61€)
The Express shipping allows you to have your order at home in less than 6 business days.
Normally it takes 4 days, which is quite affordable if you need urgently a pair of lenses for a cosplay or costume, etc
You can choose your circle lenses with power for the same price!
Uniqso está teniendo una promoción especial de que si compras 2 PARES de lentillas y eliges los gastos de envío Express te costarán solo $15 (11.61€)
Los gastos de envío Express te permiten tener tu pedido en casa en menos de 6 días laborables. Normalmente suelen tardar unos 4 días, lo cual es bastante asequible si necesitas unas lentillas urgentemente para un cosplay, disfraz, etc
Puedes pedir tus lentillas graduadas por el mismo precio!

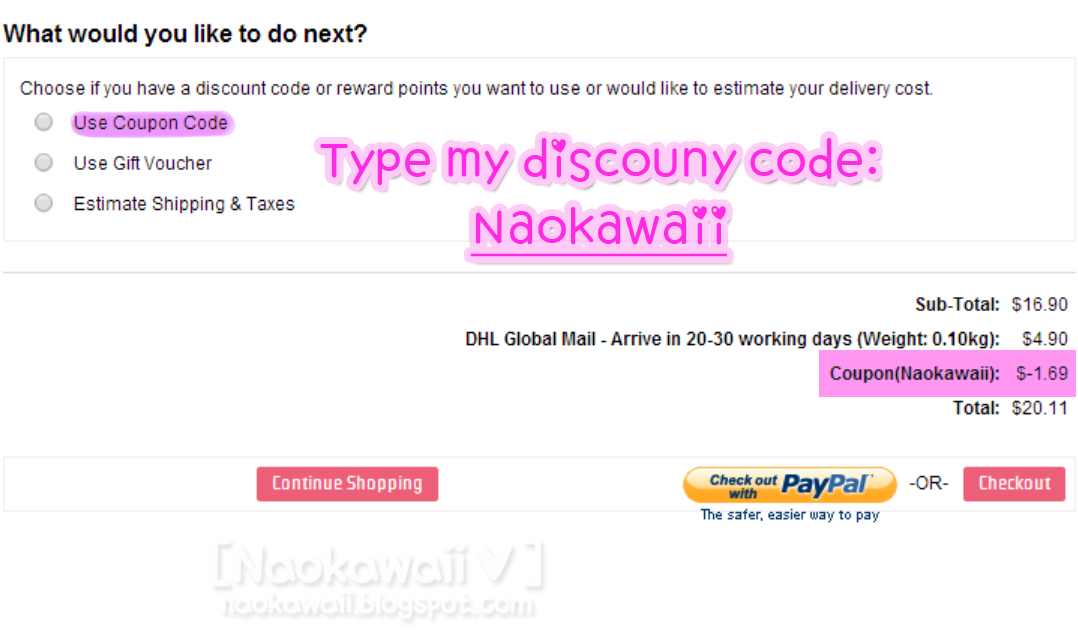
The only thing you need to do is make a order of 2 pairs of circle lenses from this LINK ( http://www.uniqso.com/index.php?route=common/home&tracking=520258499781a ), use the Express shipping and then USE MY DISCOUNT CODE: Naokawaii for a 10% discount.
Using the tracking link is really important to follow the number of customers i bring to the store.
Then I will show you how:
Lo único que tenéis que hacer es hacer vuestro pedido de 2 pares de lentillas en éste LINK ( http://www.uniqso.com/index.php?route=common/home&tracking=520258499781a ), elegir los gastos de envío Express y por último USAR MI CÓDIGO DE DESCUENTO: Naokawaii para un 10% de descuento.
Usar el enlace de seguimiento es importante para saber el número de clientes que traigo a la tienda.
A continuación os mostraré como:


Entra en Uniqso desde el LINK ( http://www.uniqso.com/index.php?route=common/home&tracking=520258499781a )


Order 2 PAIRS of circle lenses. No more or less pairs and introduce my discounto code: Naokawaii
Haz tu pedido de 2 PARES de lentillas. Ni más ni menos pares e introduce mi código de descuento: Naokawaii


Choose the Express Shipping.
Seleciona el envío Express.


Finally checkout your order and is done!!
Al final realiza tu pedido y listo!!


The prize depends of the Circle lenses model. Not all the Cl costs the same.
El precio depende del modelo de las Circle lenses, No todas las lentillas cuestan lo mismo.

If you don't want to pay the Express Shipping you can choose the standar shipping for $4.90 (3.78€)
Si no queréis pagar los gastos de envío express podéis seleccionar el método estándar por $4.90 (3.78€)


The total order cost would be about $20 (15.46€) if you use also my code.
El coste total del pedido serían más o menos de unos $20 (15.46€) si además usas mi código.


Anyway! If you have any question don't hesitate and tell me!
I hope this help you!
Have a nice day~

En fin! Si tienes cualquier pregunta no dudes en decirmelo!
Espero que te haya ayudado!
Ten un buen día~


Friday, April 11, 2014

Guide to get super cheap Circle lenses - Guía para conseguir lentillas/ Pupilentes muy baratas


Do you love Circle lenses and want to get them really cheap?!
This is your chance!!
Te encantan las Circle lenses/ Pupilentes y quieres conseguirlas muy baratas?!
Esta es tu oportunidad!!

Uniqso is a Malaysia online store that sells a huge variety of Circle lenses.
They have a lot of brands. Brands like:  Barbie ( Dueba), Beuberry ( SUNnBON), DollyEye (EOS), I. Fairy ( Vassen) etc
Uniqso es una tienda online de Malaysia que venden una gran variedad de Circle lenses/ Pupilentes.
Tienen un montón de marcas. Marcas como: Barbie ( Dueba), Beuberry ( SUNnBON), DollyEye (EOS), I. Fairy ( Vassen) etc

ANYWAYS!! You can get your pair of Circle lenses from 21.80$ / 15.70€ Shipping costs included ( 4.90$/ 3.50€) AND FOR LESS IF YOU USE MY DISCOUNT COUPON!!

Oh!! I forget to say that the Circle lenses life is for 1 year!!

EL CASO!! Puedes conseguir tu par de Circle lenses desde 21.80$ / 15.70€ Con los gastos de envío incluidos ( 4.90$/ 3.50€) Y POR MENOS SI USAS MI CUPÓN DE DESCUENTO!!

Oh!! Olvidé comentar que la duravilidad de las lentillas es de 1 año!!

HOW?!/COMO?!

First step:
1- THIS IS REALLY IMPORTANT!! Enter to the UNIQSO'S banner from my blog that is in the right ( this LINK )
Primer paso:
1- ESTO ES MUY IMPORTANTE!! Entrar en el banner de UNIQSO desde mi blog, que está a la derecha. (en este ENLACE )


The URL adress is different because is using my blog's tracking! SO... DON'T WORRY! :3
This is actually done to keep the track of blogs. Ergo To know which bloggers bring customers to their store.
La dirección URL es diferente porque está utilizando el seguimiento de mi blog. ASÍ QUE NO OS PREOCUPÉIS! :3
Esto se hace realmente para tener un seguimiento de blogs. Es decir! Para saber que bloggers traen clientes a su tienda.

2- Choose the shipping method
2- Elige el método de envío

3- To get a 10% discount introduce my code: Naokawaii
3- Para conseguir un descuento del 10% introduce mi código: Naokawaii

4- Apply the discount coupon code and checkout!
( Applying the coupon you can get your lenses by 20.11$/ 14.48€)
4- Aplica el cupón de descuento y realiza tu compra!
( Aplicando el cupón puedes conseguir tus lentillas por 20.11$/ 14.48€)


UNIQSO reduced the rates of “Express International Shipping”
Place an order for shipping with Express Shipping via DHL Express or FedEx Priority. (From as low as $5.00*)
HERE the info
UNIQSO redujo las tasas de "Envío Internacional Express"
Haga un pedido para el envío con "envío Express" vía DHL Express o FedEx Priority. (De un precio tan bajo como $ 5.00 *)
AQUÍ la info

Was this helpful?! Have a beautiful day!! =)
Fue de ayuda?! Tened un buen día!! =)

I luv chu~~

Tuesday, August 6, 2013

How to open and care your Circle lenses- Cómo abrir y cuidar tus Circle lenses

Oh!! Sorry for not make any review at the moment. Actually i have a big acne and hormones problems, so i can't take photos of me :'( ( SO SAD!!...)
I will make a lot of reviews as soon as possible! I promise! T_T
Hola, hola a tod@s! Aquí un mini tutorial de Cómo abrir y cuidar tus circle lenses!
Oh!! Siento mucho no poder hacer reviews en estos momentos, pero actualmente sufro un gran problema de acne y hormonas, así que no puedo tomarme ninguna foto para ello :'( ( ESTOY MUY TRISTE!!...)
Haré todas las review que pueda lo antes posible! Lo prometo! T_T


Well... Maybe some of you, guys had the problem to open wrong the circle lenses bottle, but today i'm gona explain you something as easy like this!:
1. Look at the embossed mark in the steal cover! It's there where you have to lift the plastic top!
2.Then you have to pull down the plastic top and pull in a side to remove the plastic top from the steal cover.
3. Pull the steal sides carefully to not cut yourself.
4. SIMPLE! IT'S DONE! 
Bueno... Quizás a much@s de vosotr@s habéis tenido el problema de abrir mal el bote de lentillas, pero hoy os explicaré algo tan sencillo como esto:
1. Fíjate en la marca en relieve en la cobertura de hierro! Es por ahí por donde tienes que levantar la tapa de plástico! 
2. Después tienes que tirar hacia abajo la tapa de plástico para retirarla de la cobertura de hierro.
3. Tira de los latos de la cobertura de hierro para no cortarte.
4. SENCILLO! YA ESTÁ!


 Then you have to take the circle lenses of the bin. Better if you use a circle lenses clips! They are covered with a plastic cap.
Después tienes que sacar las lentillas de su recipiente. Mejor si utilizas unas pinzas para lentillas. Están cubiertas con unos capuchones de plástico.


You see? Is easier to take it!
Lo veis? Es mucho más fácil sacarlas así!

IMPORTANT!!
-You have to clean the lenses case twice with solution to desinfect it before use.
-After you take the lenses you have to set in serum solution for 8 hour befor using!
-You have to clean very well your hands because you will put the lenses in the eye area! Is very important the hygiene to minimice the bacterial infection.
-Make you sure your hands are dry free of soap.
Is better if you put on the circle lenses before before make up to avoid sticking it with the products you used with your hands.
-Basic you check the lenses are mosturized with solution and clean!

-After remoal the lenses throw the away the previous solution of the case.
-Wash the lens case with solution.
-Put a lot of solution into the contact case again
-Put the lenses on the palm of your hand and clean it carefully with solution before to remove the germs.
-Recomended you change your solution every day to avoy germs growing.

IMPORTANTE!!
-Tienes que limpiar el recipiente de las lentillas con solución de suero dos veces antes de utilizarla para desinfectar.
-Después de coger las lentillas tienes que dejarlas reposar durante 8 horas antes de usarlas.
-Tienes que lavarte muy bien las manos, pues vas a poner las lentillas en el área del ojo! Es muy importante la higiene para minimizar las infecciones de bacterias.
-Asegúrate de que tus manos estén bien secas y libres de jabón.
Es mejor que te pongas antes de maquillarte las lentillas, para evitar el contacto y que se ensucien con los productos que utilizaste con tus manos.
-Básico que revises si tus lentillas están hidratadas con solución y limpias.

-Después de quitarte las lentillas tira la solución de suero anterior del estuche.
-Limpia el estuche con solución de suero.
-Llénalo abundantemente de solución.
-Pon las lentillas en la palma de tu mano y límpialas cuidadosamente con solución para eliminar los gérmenes.
-Recomiéndo que se cambie la solución todos los días para evitar la aparición y reproducción de gérmenes.

And that's all! I don't think it's too difficult. At the end is for your eyes sake! =)
I hope this was useful for you!
Have a nice day!!
Y eso es todo! No creo que sea algo demasiado complicado. Al fin y al cabo es por el bien de tus ojos! =)
Espero que haya sido útil!
Ten un buen día!!
Lenses sponsored by UNIQSO ( Review soon!!)